
Chuck Steele
United States Air Force Academy
Abstract: This paper addresses the connections between David Beatty and ethos in the Royal Navy during World War I. The issue considered herein is the degree to which Beatty conflated his fortunes with those of the organization he served and how this blurring of identities played an outsized role in coloring expectations for the Navy in war and peace. This brief study illuminates both the performance of Beatty in battle and the struggle to protect his reputation. Ultimately, Beatty’s career as an admiral is instructive as a warning to those in military/naval circles who would sacrifice competence in core proficiencies and technical expertise for the sake of servicing a peculiar sense of fighting spirit. 1
Admiral David Beatty, Britain’s First Sea Lord at the time of the Washington Naval Conference, is one of the most controversial figures in naval history. Serving at a time of rapidly evolving technologies, Beatty epitomized the daring sort of naval officer associated with the likes of Drake and Nelson. He exuded aggressiveness, earning one biographer’s laudatory claim to be history’s “last naval hero.” 2 In appearance and demeanor, he was seemingly the quintessential British admiral. However, Beatty did not serve in the Age of Sail, and despite his appeal to those longing for continuity with the iconic figures of the past, Beatty was a man out of his depth at the dawning of the Age of Dreadnoughts. In the defining moment of his career, the opening stages of the battle of Jutland, Beatty acted rashly. His impetuosity was calamitous for thousands of British sailors and nearly delivered the most important victory of the Great War to the Imperial German Navy. Yet, despite his lackluster performance at Jutland, Beatty’s reputation was burnished after the fighting by a multitude of influential political and naval figures who enabled him to become the driving force in charting the Royal Navy’s course in the interwar years.
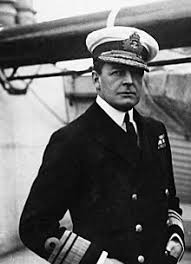
Vice Admiral Sir David Beatty (Creative Commons)
An undoubtedly brave officer, Beatty was a throwback to the Royal Navy’s most glorious age—the Age of Nelson. Like the hero of the battles of Cape St. Vincent, Aboukir Bay, and Trafalgar, Beatty made his reputation by demonstrating calmness and resolve under fire. Unlike Nelson, Beatty’s greatest achievements in combat occurred far from the line of battle. The events propelling Beatty to rapid promotion and star status in the world’s most respected navy had little, if anything, to do with seamanship or even the sea.
Beatty’s first brush with greatness occurred while serving as second in command to Stanley Colville, who was leading the flotilla of gunboats accompanying General Herbert Kitchener during his expedition in Sudan. 3 In that campaign, Beatty took over for a wounded Colville and quickly demonstrated his courage in the fighting at Dongola, winning the Distinguished Service Order (DSO) and the admiration of Kitchener. In addition to his DSO, Beatty was promoted to commander (this was remarkable in that it happened in about half the time as the other officers of his commissioning year group). 4
Beatty’s next heroic exploit, and one that would have been familiar to anyone more accustomed to bayonets than broadsides, occurred during the Boxer Rebellion in 1900. Having followed Colville to the China station, Beatty was once again at the right place at the right time to distinguish himself while under fire. Serving as executive officer to Colville, then commanding HMS Barfleur, Beatty led a contingent of that ship’s sailors in combat at Tientsin. As in the fighting four years earlier, Beatty won praise and promotion for his courage and composure. Leading by example, Beatty was out front with his men when he was wounded in the left arm and wrist. As a result of his heroism in China, Beatty was promoted to Captain at the age of twenty-nine. 5
While Beatty’s rapid promotion reflected the value put on courage by the Royal Navy, it also illuminated a lack of comprehension for the changing character of war at sea. As he would demonstrate clearly in the First World War, his weakness as an admiral was not lacking enthusiasm for the fight; it was his inability to understand the range of his responsibilities to prepare and lead a fleet in battle. In this regard, the most unsalutary consequence of Beatty’s being recognized for his bravery during land campaigns in Sudan and China was his being excused from developing the skills attendant upon gaining promotion for excellence while serving at sea.
Exacerbating the problems associated with Beatty’s lack of experience in command at sea was his marriage to Ethel Tree. Beatty’s bride was the heir to the fortune of Chicago department store mogul Marshall Field. Her wealth put Beatty in the enviable position of not having to rely upon the Navy for his financial wellbeing. Tree’s wealth insulated Beatty from the concerns of other officers. Specifically, Beatty was able to put his own desires above the needs of the Navy. At the beginning of 1910, Beatty attained the rank of rear admiral, becoming the youngest officer to be so promoted in over a century. 6 When offered the position as second-in-command of the Atlantic Fleet, Beatty declined. His refusal to serve directly beneath John Jellicoe, the fleet’s commander, not only prevented him from gaining valuable time at sea but also deprived him of the opportunity to gain insights into the methods of the man he would serve under during the battle of Jutland.
Beatty’s arrogance did not ruin his career; if anything, it won him admirers in high places—most notably Winston Churchill, who became First Lord of the Admiralty in October 1911. Churchill was thoroughly impressed by Beatty’s unconventional record, deciding to make him his naval secretary at the start of 1912. 7 According to Churchill, “It became increasingly clear to me that he [Beatty] viewed questions of naval strategy and tactics in a different light from the average naval officer: he approached them, as it seemed to me, much more as a soldier would. His war experiences on land illuminated the facts he had acquired in his naval training. He was no mere instrumentalist.” 8
Unfortunately for thousands of British sailors, Churchill could not have been more wrong in discounting the importance of technical acumen at the dawning of the 20th century. The Royal Navy of Beatty’s time was on the bow wave of a paradigm shift. In a few short years, the battle fleets of the world were transformed. At the Battle of Tsushima in 1905, Admiral Togo Heihachiro flew his flag from the British-built battleship, Mikasa. The Japanese flagship was armed with four 12-inch guns, displaced more than 15,000 tons, generated 15,000 horsepower, and could reach a speed of 18 knots. 9 Mikasa represented the height of modern battleship design when it was launched in 1900. However, by the time of the Battle of Jutland, Beatty had available to him four Queen Elizabeth class battleships—with main armament consisting of eight 15-inch guns and displacing 33,000 tons fully loaded. The Queen Elizabeth class could deliver 75,000 horsepower, and they could steam at 24 knots. 10
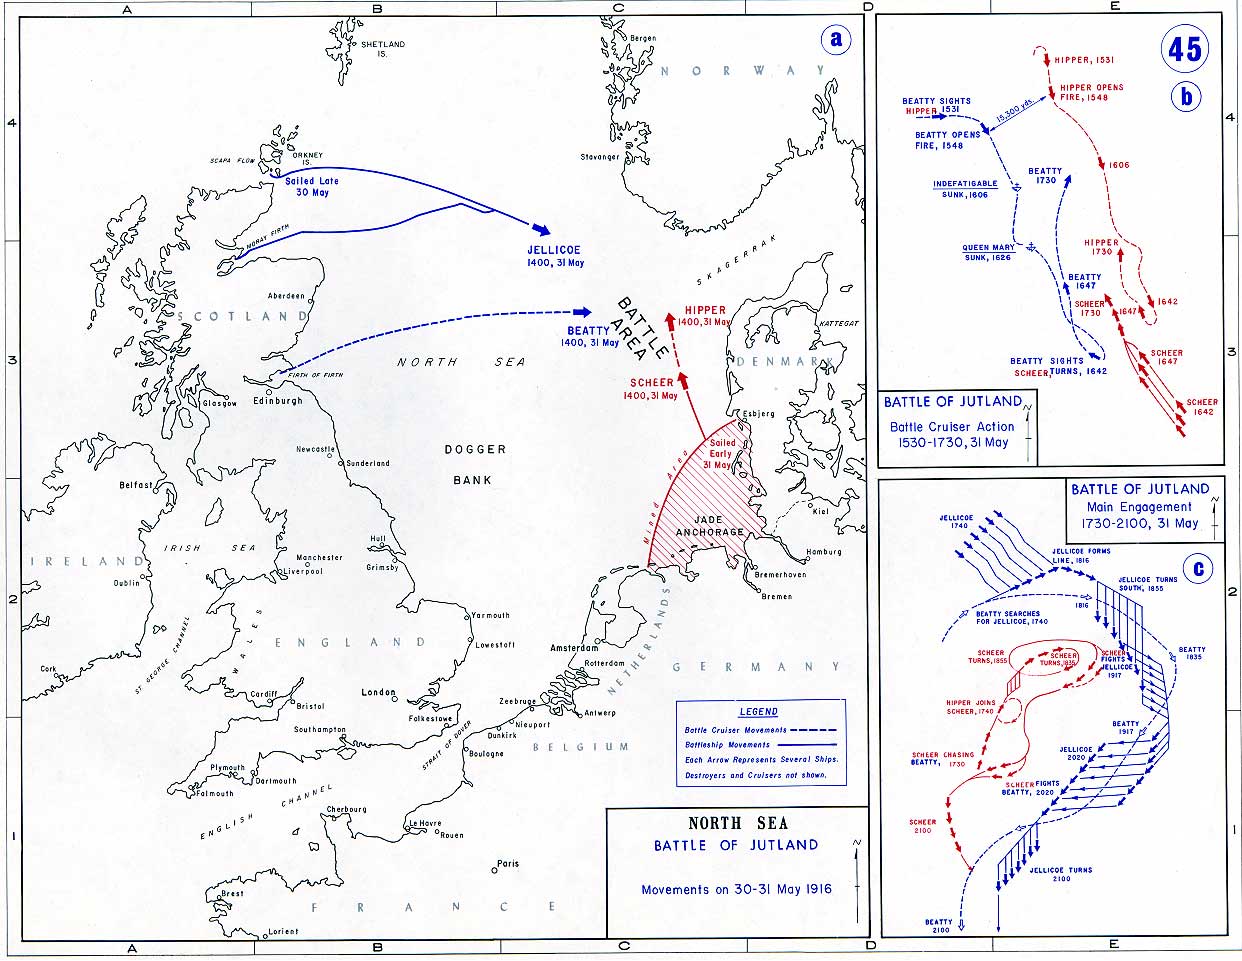
Battle of Jutland Map (United States Military Academy Department of History)
More germane to this story, Beatty’s command at Jutland was built around battle cruisers. These ships packed the punch of battleships but had even greater speed. As Churchill remarked, the battle cruisers were “the strategic cavalry of the Royal Navy, that supreme combination of speed and power to which the Admiralty were continuously directed.” 11 In May of 1916, Beatty flew his flag from HMS Lion, the lead ship in a class of battle cruisers that included Princess Royal and the Queen Mary. The new ships displaced 29,700 tons fully loaded, mounted eight 13.5-inch guns, their engines could generate 70,000 horsepower, and they could steam at a remarkable 26.5 knots. 12
In less than ten years, advances in naval architecture and armament recast the face of naval battle. According to Norman Friedman, Admiral John “Jacky” Fisher, the mastermind behind the Dreadnought and battle cruiser revolution, was fascinated by the need for attaining simultaneous increases in gunnery ranges and speed. “Only higher speed would enable a British fleet to choose its battle range so as to force an enemy to submit to a pounding he could not effectively return.” 13 Fisher’s new ships were capable of the dramatic increases he desired—but David Beatty would prove incapable of coordinating the new weapons to meet their full potential in battle.
One important factor in retarding Beatty’s development as a professional was his status as a fighting man. It has been argued that the Royal Navy’s greatest problem in 1916 was not neglect for the demands of integrating new technologies into the Grand Fleet, but more a matter of having lost touch with the service’s heritage. According to U.S. Naval War College Professor James Holmes, “by 1916 the Royal Navy had in effect forgotten about the rigors of war against a peer competitor.” 14 Of course, by May of 1916, the Royal Navy had engaged in four substantial actions against the Imperial German Navy (the battles of Coronel and the Falklands fought in the South Pacific and South Atlantic Oceans in November and December of 1914 and the battles of Heligoland Bight and Dogger Bank fought in the North Sea in August 1914 and January 1915). The problem confronting the Royal Navy, and David Beatty, in May 1916 was not that they had forgotten how to fight; it was that they proved incapable of learning appropriate lessons from their own recent experiences. If anything, Beatty, the most heralded combatant of his generation, remembered too much about how battles were fought on land or in an era far removed from that requiring his services as a fleet commander. He was the embodiment of an ethos that valued courage above competence.
While Beatty and his battle cruisers had seen action in the first clash in the North Sea, the Battle of Heligoland Bight, it was his performance nearly half a year later at the Battle of Dogger Bank that should have been cause for concern in his superiors. At Dogger Bank (24 January 1915), poor communications and inefficient shooting plagued the Royal Navy. Relying on superior signals intelligence from the Admiralty in London, Beatty took two squadrons of battle cruisers out from the Firth of Forth to meet with additional lighter British naval forces to intercept Franz Hipper’s First Scouting Group. The British had a five to three advantage in battle cruisers (Lion, Tiger, Princess Royal, Indomitable, and New Zealand against Seydlitz, Moltke, and Derfflinger). Hipper, who had put to sea in anticipation of intercepting inferior British forces, let discretion serve as the better part of valor, recoiling into headlong retreat once the disparity in forces became apparent. Meanwhile, Beatty’s battle cruisers spared no effort in trying to close the distance with the fleeing Germans. Owing to their superior speed and the Herculean efforts of British stokers, Beatty’s squadrons steamed ever closer to the Germans. Once Lion (Beatty’s flagship) was within 22,000 yards of the armored cruiser Blücher (the last and slowest ship in Hipper’s line), the British opened fire. 15
However, as the British pressed on, problems in communications and fire control became manifest. Tiger failed to target the appropriate ship (Moltke) and instead directed its fire on the Seydlitz, which was already being targeted by Lion. 16 Compounding problems for the British was the fire being poured onto Lion. The flagship was hit several times and suffered significant damage. As Lion slowed, Beatty was quickly out of position to lead, resorting solely to signal flags to direct his squadrons. The situation was made worse because the signals being issued were not clear in establishing the admiral’s intent. Beatty’s signals resulted in the remaining fully serviceable British battle cruisers concentrating their fire on the badly damaged Blücher. As the commander of the Second Battle Cruiser Squadron, Rear Admiral Archibald Moore, attested, “the Vice-Admiral [Beatty] made a general signal: ‘Attack the rear of enemy bearing NE’; this was apparently the Blücher (she bore approximately NE from New Zealand at the time).” 17 At the end of the battle, the unfortunate armored cruiser had drawn the overwhelming attention of Beatty’s battle cruisers and was the only one of Hipper’s ships sunk.
In addition to poor communications, British gunnery was abysmal, with only one percent of rounds hitting home at ranges between 16,000 and 18,000 yards. 18 Beatty had not done well in preparing or controlling his forces. The battle was a lost opportunity for the British that highlighted poor communications and ineffective standard operating procedures. Nevertheless, in its aftermath, Beatty was honored for having routed the Germans. 11 Obviously, Britain thirsted for a hero of Nelsonic proportions, but unlike Nelson, Beatty failed to achieve decisive results, even with numerical advantages Nelson would have envied. The Great War at sea was not simply a struggle between a sea power and a land power; this was a contest between Europe’s most industrialized nations—with fleets that were technological marvels representing the full measure of both belligerents’ mechanical prowess.
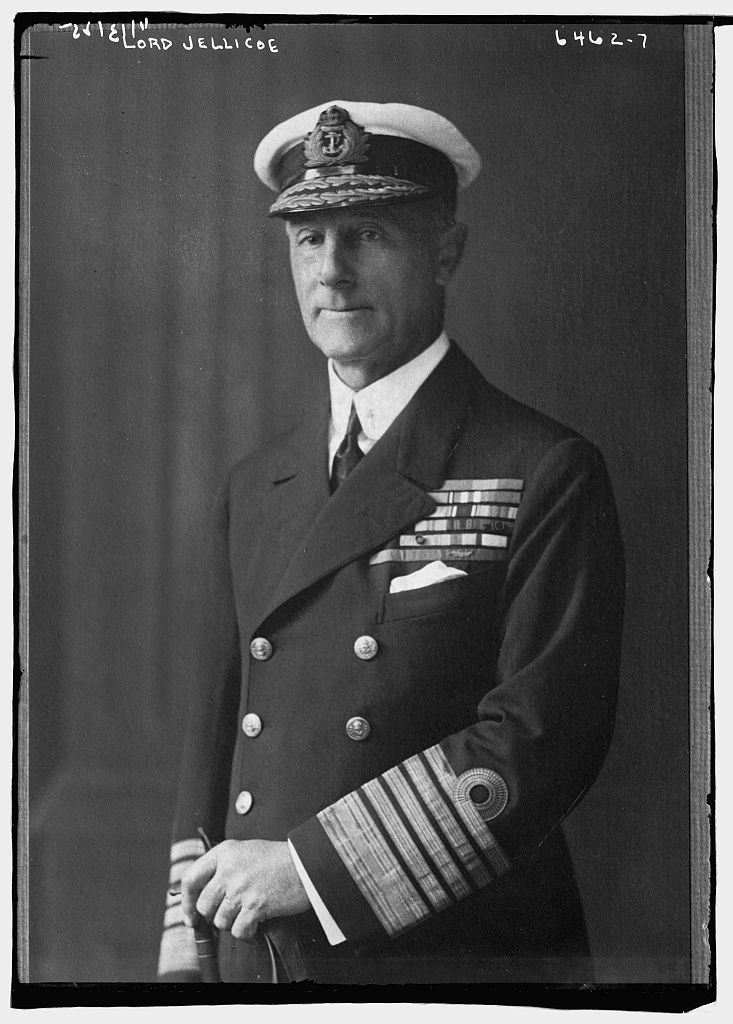
Admiral of the Fleet John Jellicoe, 1st Earl Jellicoe (Library of Congress)
Furthermore, Beatty had not cultivated a group of competent and audacious subordinates, similar to Nelson’s famous band of brothers. Beatty was brave and ambitious, but neither of those things obviated the need for him to develop a team that shared an understanding of how a modern sea battle should be fought. A case in point being Moore, who, for his efforts to point out the confusion caused by Beatty’s poor communications, was reassigned by Churchill and replaced by Rear Admiral William Pakenham, an ardent supporter of Beatty. The Royal Navy had spent centuries developing a unique warrior ethos, and Beatty seemed to be its arch exemplar in 1915. Rather than scrutinize his failure to prepare for the chaos of battle and produce a victory worthy of the assets under his command, the Admiralty sang the praises of its anointed hero and left the weight of his mistakes to be borne by Moore. As Beatty confided to Jellicoe not long after the battle, “. . . 1st Lord [Churchill] was in a disturbed frame of mind and wanted to have the blood of somebody. I gather this is the First Sea Lord’s [Fisher] idea also; they settled on Moore.” Adding his condemnation to that of the Admiralty, Beatty wrote, “[w]ell frankly between you and I he is not of the right sort of temperament for a BCS [battle cruiser squadron].” 20
Perhaps fearing that Beatty was feeling too much pressure to be a modern-day Nelson or that he might not be the most assiduous student of naval affairs, Jellicoe wrote the following to him in March 1915:
I am starting to write a difficult letter. I should imagine that the Germans will sooner or later try and entrap you by using their battle cruisers as a decoy. They must know that I am—where I am—and you are where you are, and they may well argue that the position is one which lends itself to a trap to bring you into the High Seas Fleet, with the battle cruisers as bait. They know that if they can get you in chase, the odds are that you will be 100 miles away from me, and they can under such conditions draw you well down to the Heligoland Bight without my being in effective support. It is quite all right if you keep your speed, of course, but it is the reverse if you have some ships with their speed badly reduced in the fight with the battle cruisers, or by submarines. In that case the loss of such ships seems inevitable if you are drawn into the vicinity of the High Seas Fleet with me still too far off to get to your help or to their help, so as to extricate before dark. 21
Jellicoe’s note was prophetic. Reinhard Scheer, the Commander in Chief of Germany’s High Seas Fleet, set the very trap Jellicoe feared at the end of May 1916. At the Battle of Jutland (31 May – 1 June 1916), Beatty played directly to German expectations. However, with the Grand Fleet anticipating Scheer’s course of action, Beatty was not merely the victim of well-reasoned German planning but also the bait in a far more extensive engagement that would feature the full might of the Grand Fleet.
Sortieing once again upon receiving signals intelligence from London, indicating Hipper’s Scouting Group was putting to sea, Beatty led the Battle Cruiser Fleet to search for Hipper’s forces. Once outlying elements of the two fleets came into contact with each other, the larger ships of the battle cruiser forces were drawn together. In short order, a heated moving battle took shape between the opposing battle cruisers. The fighting was intense and extremely costly for the British. Beyond getting the better of Beatty in combat, Hipper was playing his part in leading Beatty on a chase toward Scheer in what is known as the “Run to the South.”
Beatty’s force consisted of six battle cruisers (Lion, Queen Mary, Princess Royal, Tiger, New Zealand, and Indefatigable) and Rear Admiral Hugh Evan-Thomas’s Fifth Battle Squadron (Barham, Valiant, Warspite, and Malaya). Beatty’s fleet ordinarily did not include Evan-Thomas’s battle squadron, but Horace Hood’s Third Battle Cruiser Squadron (Invincible, Inflexible, and Indomitable) was temporarily attached to the Battle Fleet, and the Queen Elizabeths were sent south in their stead. 22 Not surprisingly, in the short time that Evan-Thomas had traded places with Hood, communications between Beatty and the Fifth Battle Squadron commander were poor at best, and there was a lack of understanding over Beatty’s operating procedures. 23 These discrepancies could not be cleared up under fire and at full speed.
In his rush to come to grips with his old adversary, Beatty not only outstripped the support of Evan-Thomas’s immensely powerful battleships, but in driving on so quickly, he also surrendered the advantages of superior gun range that his battle cruisers held over their five German counterparts (Lützow, Derfflinger, Moltke, Seydlitz, and Von der Tann). Instead of engaging at more than 20,000 yards, it was estimated that Beatty opened fire at a range inside 18,000 yards—possibly as low as 16,000 yards. Seemingly, the British solution to the problem of ineffective gun ranging was not to be found in firing more rounds from longer ranges but firing more rounds from shorter ranges. Rather than meet the intent of the battle cruiser’s design, to combine greater speed with the ability to engage at a relatively safe distance, Beatty’s ships were well within the range of Hipper’s battle cruisers when the fighting began at approximately 3:45. 24 The British were in a dire predicament concerning their vulnerability to German fire that was exacerbated by being silhouetted against the western sky—thus allowing for easier target acquisition by their foes. 25
Additionally, as the distance between the disparate parts of Beatty’s command grew, it became more difficult to maintain communications between the battle cruisers and the battleships. While Moore had been replaced after voicing his concerns over the confusing signals at Dogger Bank, Beatty had nonetheless retained his signals lieutenant, Ralph Seymour. Despite more than a year intervening between the battles, matters were unimproved in terms of the clarity of communications between Lion and the other ships under Beatty’s command. Indeed, as the battle cruisers formed into line, they once again failed to target all of Hipper’s battle cruisers. Having a one-ship advantage over Hipper, Beatty had called on Princess Royal (the ship immediately behind his own) to concentrate fire on Hipper’s flagship, the Lützow. Regrettably for the British, the next ship in the German line, Derfflinger, was initially left unmolested by the third ship in Beatty’s formation (Queen Mary). 25
The consequences of Beatty’s haste were disastrous. At 4:02, the British lost the battle cruiser Indefatigable, and at 4:26, they lost Queen Mary. 27 In the span of less than half an hour, Hipper had sunk a third of Beatty’s battle cruisers, and the Germans had taken the lives of more than 2,000 British sailors. Making matters worse, following Hipper’s First Scouting Group was the main force of Scheer’s High Seas Fleet. Beatty’s battle cruisers and Evan-Thomas’s battleships were thoroughly drawn into the trap Jellicoe had foreseen. Like sharks drawn to blood, Scheer’s battleships pressed on to complete the destruction begun by Hipper. Knowing that Jellicoe and salvation were behind him, Beatty turned his forces north to lead the Germans into a broader clash with the entire Grand Fleet.
Again, distance and communication proved difficult, and Evan-Thomas’s battleships passed Beatty and his remaining battle cruisers before making their turn to the north under very heavy fire from the High Seas Fleet. According to naval historian Eric Grove, the effective defeat of the Battle Cruiser Fleet in the “Run to the South” was caused not just by poor shooting but flawed tactics that did not take advantage of his gunnery superiority and by an unwillingness to concentrate with the Fifth Battle Squadron. 28
It is somewhat ironic that regardless of the misfortunes that had befallen Beatty’s fleet, the German hunters were on a course to become the hunted. At least one historian (Andrew Gordon) has posited that Beatty’s escape to the protection of Jellicoe’s guns was “a tribute to his [Beatty] leadership, single-mindedness, and stamina,” yet even in this, Beatty was not beyond reproach. 29 Again, poor communications from Beatty, or rather non-existent communications, left Jellicoe without proper situational awareness. Earlier in the day, the Commander in Chief of the Grand Fleet was aware that battle had been joined between the battle cruiser forces of the two fleets and then that the High Seas Fleet had entered the fray. However, while Jellicoe knew that Scheer and his fleet were in pursuit of Beatty and the Battle Cruiser Fleet, the senior British commander was aware of little else until the two parts of the British fleet made visual contact shortly before 6:00. When Beatty finally was in sight of Jellicoe, the latter pressed Beatty for the course and bearing of the Germans—he received the bearing, but not the course. 30
Still, Jellicoe’s battleships maneuvered expertly to steam into line, firing full broadsides into the bows of the German High Seas Fleet when contact was made at approximately 6:30. As evening turned to night, the Grand Fleet’s twice crossing of the German T placed Scheer in an untenable position, making retreat his most attractive option. Scheer would succeed in his efforts to escape, aided by night and more communications problems—this time throughout the Grand Fleet. The battle ended in the early hours of 1 June, but the controversy was just beginning.
Remarkably, Beatty’s reputation as an admiral was not ruined by the response his fleet made to the German challenge. Almost immediately after the battle, Beatty and his supporters sought to cast the fight in a new light. To Beatty and his partisans, the battle was not a failure because of the losses to the Battle Cruiser Fleet, but because Jellicoe failed to annihilate the German Fleet. In the words of Beatty’s adoring subordinate Pakenham, “To us it looked as though all was over with the Germans but the killing, . . . Of one thing I am confident. If there had been a David in the battlefleet, we should have had a different tale to tell.” 31
Though Jellicoe received the lion’s share of criticism for failing to deliver an industrial age Battle of Trafalgar, it was the losses to Beatty’s battle cruisers that gave Germany its greatest claim to success at Jutland. Despite his earlier exposure to battle in the North Sea, Beatty failed to capitalize on his experiences and neither improved procedures for clearer communications nor engaged in practices facilitating more effective gunnery. Indeed, British efforts to increase their rates of fire led to dangerous practices for the stowing and handling of ammunition throughout the Grand Fleet. Nonetheless, the problems associated with those practices were most acute in the battle cruisers, owing to their diminished ability to sustain a pounding from heavy caliber guns. The advantages of the battle cruiser’s superior speed and gun range, as envisioned by Fisher, were lost on Beatty at Jutland. Perhaps a mere instrumentalist would have fared better. After all, it was the battle cruisers, the weapons platform Churchill thought ideally suited to the command of Beatty that were at the heart of the cataclysmic losses among the British at Jutland. As naval historian John Brooks points out, Beatty committed a catalog of errors showing an uncharacteristic lack of composure that was compounded by an effort to distort the record of the fighting in his favor. According to Brooks, “. . . there was little that was truly heroic in Beatty’s leadership at Jutland.” 32
As they had been after Dogger Bank, Beatty’s shortcomings were overlooked and blame was assigned to Jellicoe for delivering an incomplete victory, or worse. Far from being held accountable for any of his failings at Jutland, Beatty was rewarded for his service—replacing Jellicoe as the Commander of the Grand Fleet once the latter was made First Sea Lord to deal with the U-boat menace. At war’s end, Beatty took the greatest of laurels retaining command of the Grand Fleet during the surrender of the High Seas Fleet. In November 1919, Beatty became First Sea Lord—a position he would hold for eight years. His performance as First Sea Lord during the 1920s was far more laudable than his efforts as a fleet commander. Beatty proved to be an adroit advocate for the Royal Navy, maintaining its standing at the fore of world navies regardless of the austerity brought on by the end of the Great War. According to Andrew Lambert, it was Beatty’s time as First Sea Lord that showed his “true greatness as an admiral.” 33
However, after the war, Beatty’s efforts to achieve a favorable interpretation of his role at the battle of Jutland put him at odds with many who fought at Jutland and several notable historians, not the least being Julian Corbett, the author of Some Principles of Maritime Strategy and the History of the Great War Naval Operations, Based on Official Documents. When Corbett’s official history was published, the Admiralty, firmly under Beatty’s influence as First Sea Lord, saw fit to distance themselves from criticism and issue a disclaimer stating, “Their Lordships find that some of the principles advocated in this book, especially the tendency to minimize the importance of seeking battle and of forcing it to a conclusion, are directly in conflict with their views.” 34 Furthermore, in the years after the battle, other accounts of the fighting were written by partisans of both Beatty and Jellicoe. Beatty, for his part, actively sought to change the historical record concerning his actions, despite many of the battle’s participants and chroniclers being aware of the disingenuous nature of Beatty’s editorial efforts. The inevitable verdict of the attempts to rewrite history being that Beatty knew how poorly he performed in command.
In Britain, the nation that sets the standard for professionalism by which modern navies are often judged, it is not surprising that a chasm developed between the emphasis placed on the preservation of ethos as opposed to proficiency in mastering new habiliments of war. Specifically, in the case of David Beatty, the Royal Navy chose to honor his most daring deeds for the sake of reaffirming its ethos, as opposed to insisting upon a more thorough understanding of the possibilities and limitations of Dreadnoughts and battle cruisers. Unfortunately, ethos is often more a product of mythology than a thoughtful understanding of the past, and Beatty as an exemplar of a particular ethos was almost too much for the Royal Navy to bear as it struggled to maintain command of the seas in the Great War.
(Return to December 2021 Table of Contents)
Footnotes
- The views expressed are those of the author and do not necessarily reflect the official policy or position of the Department of the Air Force, the Department of Defense, or the US Government. PA# USAFA-DF-2021-308. This paper is drawn largely from a chapter in a soon-to-be-published book: History’s Worst Military Leaders co-edited by this paper’s author and Prof. John Jennings also of USAFA. The book will be published by Reaktion Books in the UK and the University of Chicago Press in the US. The publication is scheduled for March of 2022. ↩
- Stephen Roskill, Admiral of the Fleet Earl Beatty: The Last Naval Hero (Barnsley: Seaforth Publishing, 2018). ↩
- Andrew Lambert, Admirals: The Naval Commanders Who Made Britain Great (London: Faber and Faber, 2009). p. 339. ↩
- Robert Massie, Castles of Steel (New York: Random House, 2003). p. 86. ↩
- Roskill, pp. 32-33. ↩
- Roskill, p. 42. ↩
- Winston Churchill, The World Crisis 6 vols. (New York: Charles Scribner’s Sons,1923–31), vol. 1, p. 88. ↩
- Churchill, vol. 1, p. 88. ↩
- Bernard Ireland, Jane’s Battleships of the 20th Century (New York: Harper Collins, 1996). p. 68. ↩
- Ireland, p. 115. ↩
- Churchill, vol. 1, p. 89. ↩
- Ireland, p. 109. ↩
- Norman Friedman, The British Battleship 1906-1945 (Annapolis: Naval Institute Press, 2015). p. 62. ↩
- James Holmes, ‘The U.S. Navy Has Forgotten How to Fight,’ Foreign Policy November 13, 2018 (https://foreignpolicy.com) ↩
- James Goldrick, Before Jutland: The Naval War in Northern European Waters, August 1914-February 1915 (Annapolis: Naval Institute Press, 2015). pp. 265-266. ↩
- Goldrick, p. 268. ↩
- Archibald Moore After Action Report dated 25 January 1915, B. McL. Ranft ed. The Beatty Papers: Selections from the Private and Official Correspondence of Admiral of the Fleet Earl Beatty two volumes (London: Navy Records society, 1989). p.207. ↩
- Sweetman, p. 354. ↩
- Churchill, vol. 1, p. 89. ↩
- Beatty letter to John Jellicoe, dated 8 February 1915, Temple Patterson ed. The Jellicoe Papers: Selections from the private and official correspondence of Admiral of the Fleet Earl Jellicoe of Scapa two volumes (London: Navy Records Society, 1966). Vol. 1, p. 144. ↩
- John Jellicoe letter to Beatty, dated 23 March 1915, Temple Patterson ed. The Jellicoe Papers Vol. 1, p. 152. ↩
- Julian Corbett, History of the Great War Naval Operations, Based on Official Documents (London: Longmans, Green and Co., 1923), vol 3, p. 318. ↩
- Andrew Gordon, The Rules of the Game: Jutland and British Naval Command (Annapolis: Naval Institute Press, 2012). pp. 54-58. ↩
- Corbett, pp. 333-334. ↩
- Corbett, p. 334. ↩
- Corbett, p. 334. ↩
- Gordon, p. 613. ↩
- Eric Grove, New Introduction to Roskill. ↩
- Gordon, p. 2. ↩
- Corbett, pp. 355-356. ↩
- Rear Admiral Pakenham to Margaret Strickland-Constable, 9 June 1916, East Riding Archives and Records Service: DDST/1/8/1/17. Quoted in David Stevens, In All Respects Ready: Australia’s Navy in World War One (South Melbourne: Oxford University Press, 2014). p. 215. ↩
- John Brooks, The Battle of Jutland (Cambridge: Cambridge University Press, 2016). p. 543. ↩
- Lambert, p. 366. ↩
- Corbett, introduction. ↩