
Contents:
Australians and Coalition Warfare during World War II
Command
Preparing for the OBOE Operations
Australian Organization and Structure
OBOE I: Tarakan
OBOE VI: Brunei Bay and Labuan
OBOE II: Balikpapan
Action at Balikpapan
Lessons Learned and Lessons Missed
Gregory P. Gilbert
Defence Analyst
The last months of World War II saw Australian-led Allied forces liberate Borneo from Japanese occupation in what is now practically a forgotten campaign. 1 Australia had experienced six years of war, however the Borneo invasion was the first and only Australian joint and combined campaign of World War II (WWII). The Royal Australian Navy (RAN), the Australian Army and the Royal Australian Air Force (RAAF) had extensive tactical level experience working under British and/or American commanders, but they had very little experience working jointly at the operational or strategic levels of war.
This paper evaluates the Australian contribution to the Allied war effort in the context of the Australian experience of joint and combined operations in the Borneo 1945 campaign. The Australian approach to coalition warfare is also be discussed.
Australians and Coalition Warfare during World War II
Australian military culture was, and still is, unique, although it is grounded in Western European traditions. As such it has often been misunderstood by members of other nations’ armed forces, particularly by those whose own military forces are built upon strong traditions of independent national will. Modern Australian culture has changed significantly but many features of Australian military culture have not changed since WWII. Although the nation is politically independent, its military culture remains dependent upon great powers. Current Australian military doctrine explains the situation during WWII. 2
During the first half of the twentieth century Australia, as a part of the British Empire, demonstrated a strong affiliation with Anglo-Saxon cultural, diplomatic and military norms. In many ways Australia was historically, culturally and demographically a part of Europe, and yet geographically was part of Asia. During this period, we played a major role in upholding and preserving fundamental western democratic beliefs by our participation in both World Wars.
For the vast majority of Australian serving men and women they served the Queen and the British Empire. Australia was itself a self-governing dominion of the British Empire. As a result, throughout WWII there were four distinct approaches to Australia’s contribution to the Allied war effort. 3
- Individuals served as volunteers in the British armed forces
- Australian military personnel were integrated into British/American units
- Australian military units were allocated to larger British/American formations for operations
- Australian forces were formed into national formations for Australian led operations.
In the first approach individuals were employed and paid directly by their parent Service. They were also subject to the military law and regulations of that foreign Service, although it is doubtful whether Australians who served in this manner ever saw themselves as mercenaries. That is, an Australian serving with the Royal Navy, was treated exactly the same as if they were born in the UK. Such people differed from those of the second approach, who were employed and paid by the Commonwealth of Australia and who were subject to Australian military law and Service regulations. The first approach was relatively common during World War I, and it continued in 1939 when, once again, the Australian Government did nothing to prevent a considerable number of Australian-born individuals from joining the British armed forces directly. The Australian Government also agreed with the British policy to accept large numbers of RAAF airmen and considerable numbers of RAN sailors to serve within British units. This decision to integrate dissipated the visibility of the Australian contribution throughout the empire, and worked against the considerable efforts made to establish an Australian military identity in the air and at sea. Even when fully manned Australian ships, divisions and squadrons were generated and sent to Europe, they were inevitably placed under larger British commands under British senior commanders and used in operations in which the Australian Government had little, if any, say. In effect strategic and operational level decision making was exercised by the British.
The situation changed in December 1941 with American’s entry into and the start of the Pacific War. When Singapore was lost and the British withdrew to the western Indian Ocean, Australians looked towards the United States not just for support but also for leadership. They saw a need to replace British strategic leadership with American strategic leadership. When General Douglas MacArthur was appointed as Commander in Chief Southwest Pacific Area (SWPA), the Australian Government devolved much of their responsibility directly to him. In the words of the official historian, Gavin Long, the Australian Government ‘had made a notable surrender of sovereignty’. 4 The British also agreed with the decision to place all of the Pacific Commands under the United States (US) Joint Chiefs of Staff (JCS). That said, MacArthur and the American military were less willing than the British to accept Australian military integration within their units. Very few Australians volunteered for service with US forces, although there are a few notable ones who did. 5 During 1942-43 many RAAF aircrew flew with United States Army Air Force (USAAF) crews in New Guinea, while a shortage of experienced personnel meant many Australians also served under contract with the US Army Small Ships Section in the SWPA. Much of the intelligence organization operating in the SWPA, such as Central Bureau, included Australian, British and US personnel. However such integration was not the norm. Prior to MacArthur’s arrival in Australia the Allied General Headquarters (GHQ) included a mixture of Australian and American personnel. It did not take long before MacArthur made his GHQ a closed American shop with a preference for the ‘Bataan Gang’. 6
During 1944, as US forces surged into the SWPA, it became increasingly clear that if Australia wanted to make a major contribution in the Pacific War it needed to deploy its own joint force. The Borneo 1945 campaign was one of the few instances of Australian military leadership choosing the fourth approach, listed above. Forces from all three Australian services had to work closely together within a national military structure, under national leadership. In Australian military history mention of the Borneo campaign is a rarity. Despite Australians frequently demonstrating remarkable courage and professionalism at the tactical level, and with the majority of Australian fighting units serving under British command in Europe and under American command in the SWPA, Australian commanders had limited opportunities to gain warfighting experience at the operational or strategic levels.
Command
On 3 April 1945 the US JCS issued a directive to General Douglas MacArthur, Commander-in-Chief SWPA, instructing him to make plans for occupying North Borneo, using Australian combat and service troops. 7 In the same directive, JCS ordered MacArthur to occupy Brunei Bay immediately after Tarakan, and to cancel his plans to liberate Java. Thus GHQ SWPA issued orders for three OBOE operations: 8
OBOE I—Tarakan Island (1 May 1945)
OBOE VI—British Borneo (10 June)
OBOE II—Balikpapan (1 July)

The Borneo Campaign, May-July 1945
Source: Willoughby, C.A. (ed.), Reports of General MacArthur, Vol. I: The Campaigns of MacArthur in the Pacific, Washington DC, 1966, p. 384.
From its establishment in March 1942 until early 1945 the SWPA was commanded by General MacArthur, with joint planning undertaken by his GHQ SWPA. MacArthur was responsible for joint strategic and operational level command of all campaigns in theatre, although his orders were executed through his subordinate single-service commanders. 10 For the Borneo campaign these were: Vice Admiral Thomas C. Kinkaid as Commander US Seventh Fleet 11, Lieutenant General George C. Kenny as Commander Allied Air Forces SWPA, and the Australian General Thomas Blamey as Commander Allied Land Forces SWPA. 12 In fact, MacArthur preferred to command his land forces directly at the Army Corps or equivalent level and thus General Blamey’s role was actually limited to Australian homeland defense. 13 MacArthur issued orders directly for the land force component (I Australian Corps under the Australian Lieutenant General Leslie Morshead) 14, through General Kenny to the air component (RAAF Command under the Australian Air Vice Marshal William ‘Bill’ Bostock), and through Admiral Kincaid to the naval force (Seventh Amphibious Force under Vice Admiral Daniel E. Barbey, USN).
MacArthur never appointed joint task force commanders, preferring to keep the final operational level decision making to himself. Admiral Barbey succinctly explains how ‘jointness’ was achieved in the SWPA:
There was no unity of command of the various services below General MacArthur’s level, which was contrary to the principle of unified command in all operations in other combat areas. Our landings were planned and carried out on the basis of cooperation. It was a bit unorthodox but it worked – perhaps because General MacArthur was always in the background and ready to handle any recalcitrants. 15
Preparing for the OBOE Operations
Although it is often left unstated, the prerequisite for the amphibious operations against the Japanese in Borneo was Allied sea and air control. 16 The US Pacific Fleet had decisively defeated Japanese naval forces in the Battle of the Philippine Sea in June 1944 and at the Battle of Leyte Gulf in October 1944. In the meantime, the Allied air forces in the SWPA had advanced along the northern coast of New Guinea and to the Philippines, destroying all enemy forces in their path. An air offensive from northern Australia had destroyed Japanese air power in the Netherland East Indies (NEI) and had effectively blockaded Japanese shipping in the area. By early 1945, the Allies had sea and air supremacy across Borneo. 17 Australian Special Forces were also sent to work with Borneo resistance fighters against the Japanese occupation forces. 18 The US Navy’s unrestricted submarine campaign complemented the Allied air offensive to impose what was an effective sea blockade on the Japanese occupation forces in the NEI. 19 By early 1945, with US forces in the Philippines, Borneo was effectively isolated.
During 1945, the Allied intelligence on the Japanese garrisoning Borneo was quite reliable. At the start of the campaign the Allies estimated that there were 25,000 to 30,000 troops of the Japanese Thirty-seventh Army and miscellaneous naval units garrisoning Borneo. 20 There were just 53 Japanese combat aircraft on that island, and another 400 aircraft throughout Southeast Asia. The Imperial Japanese Navy was a fragment of what it had been in 1942, but a sizeable fleet was based in Singapore, albeit suffering materiel deficiencies due to their complete isolation from Japan.
Operational planning for the amphibious phases of OBOE commenced in earnest on 21 March 1945. The GHQ plan was selectively reproduced and expanded by each of the Allied Land, Air, and Naval Forces commanders and then in turn by the amphibious assault and landing force commanders. As one might expect, the experience of the previous 34 amphibious invasions conducted in the SWPA by the Seventh Fleet since 1943 contributed significantly to the smooth planning process. This level of planning was already familiar to the RAN elements which had worked within the Seventh Fleet since early 1942, but was much more detailed than that commonly used by the RAAF and the Australian Army. Planning for the OBOE VI and OBOE II operations were even more exacting than the first operation, due mostly to the lessons learnt from Tarakan.
This is not to imply that the planning process always ran smoothly. At Balikpapan, for example, Major General Milford’s Australian Army planners selected a landing beach, Klandasan, but which was considered by the Navy planners to be highly unsuitable. 21 It meant that minesweepers had to operate under enemy guns for 15 days before the actual landings, on ‘F-Day’ 1st July 1945. All surprise was lost, and it was only due to one of the most intensive air and sea bombardments of the Pacific War that the strong defensive positions along the beach were obliterated. The Australian Army planners wished to assault the strongest positions directly and thus avoid a coastal advance from a lesser defended landing beach. The Army opinion prevailed, but after the war Admiral Barbey claimed that in conducting amphibious operations the Australian troops ‘were behind the times … unskilled, and knew little about their equipment’. 22
Australian Organization and Structure
The Australian organization and structure during the Borneo 1945 campaign was exceedingly complex. Its origins went back to early 1942 when General MacArthur made significant changes to the SWPA theatre organization. As was to be expected from American military culture, certainly in-line with his own WWI experience, MacArthur ‘was most reluctant to place US forces under an Australian army commander’. 23 The initial Allied (American-Australian) command structure was replaced with one based upon national headquarters.
In fact these changes had significant repercussions for Australian organization in the latter years of the war. The formation of the Southwest Pacific Command and the allocation of the majority of RAN operational units to the US Seventh Fleet meant that Australian control over their employment diminished over time. 24 However, operational effectiveness, coordination and interoperability between the RAN and the US Navy increased over time. From late 1943, US Navy doctrine, materiel, logistics, training, communications, command and control procedures had been generally implemented (or Australianized) by the RAN in the SWPA. ‘Ship for ship, the RAN cruisers and destroyers felt that they were more than a match in fighting power for the Americans’. 25 Australian Navy units in the SWPA adopted the US approach to amphibious warfare, while their compatriots in the Mediterranean, the Indian Ocean and in Australian home waters, retained the traditional British Admiralty procedures. 26 This meant that the Australian naval contribution to the Borneo campaign formed an integral part of the Allied Naval Forces under the command of the US Seventh Amphibious Fleet. The Australian Navy units were almost indistinguishable from their US Navy counterparts, and many Australian naval officers were integrated within the US Navy command structure at the tactical level. For a small force the Australian Navy’s contribution during the Pacific War was exceptional. 27
The situation was not quite so rosy for the Australian Army and the RAAF. Both of these Services had tried strongly to retain a measure of independence from the Americans at the operational and tactical levels. 28 In mid 1943 the Australian Army’s contribution to the Pacific War was re-examined. 29 To relieve US forces who were needed for the advance through the Philippines, MacArthur desired Australian forces to assume the responsibility for the continued neutralization of the enemy in Australian and British territory in the SWPA (New Guinea, New Britain and Bougainville). In order to meet the Australian Government’s wishes that the Australian military effort should be ‘on a scale to guarantee her an effective voice in the peace settlement’, MacArthur agreed to utilize an Australian expeditionary force (I Australian Corps) of two divisions at the forefront of the Allied forces until the end of the Pacific War. Unfortunately this redeployment of Australian troops, coupled with an almost complete absence of Australian military achievements in the media, 30 helped foster the belief that the nation’s forces were being left behind to ‘mop-up’ after the Americans who were doing the real fighting in the Pacific War. Once the impression that MacArthur was using Australian soldiers as a ‘Second XI’ was entrenched in the Australian psyche, it was almost guaranteed that the Borneo campaign would be interpreted at home as just more ‘mopping-up’. 31
Unlike the Australian Navy, the Australian Army continued to be fundamentally British in outlook. I Australian Corps was organized, administered, equipped and trained along British lines. Army doctrine was British at its core, although it was modified at the tactical level by Australian training in the techniques of jungle warfare and by American influence in amphibious training. 32 The Australian Army also suffered from what could be called an ‘infantry’ mindset. It was an army that fought and moved at a soldier’s walking pace, and with a soldier’s perception of the campaign. In general Australian commanders saw their infantry battalions as their main fighting units, which would undertake the most important military tasks, with or without support from the Australian Army’s other arms (artillery or armor), from the navy or from the air force. As one Borneo battalion commander put it ‘tanks and artillery were always nice to have but the prudent commander did not rely on them’. 33 The Australian Army also believed that there were basic differences between their own and American soldiers.
The Australians and Americans fought entirely different campaigns. When the Aussie infantryman lacked immediate artillery support they would storm the enemy and take the objective by sheer perseverance and bravery. … The Yank style of fighting was to wait for the artillery to come up and let the big guns blast the enemy positions as barren of all life as possible. It saved many American lives and got better results, although it took longer. 34
Disagreements between Major General Milford, the ground force commander, and his naval and air force counterparts prior to the invasion, suggest that he and his staff lacked an understanding of the important roles that the other Service’s supporting units had to play in the amphibious operation. The conduct of Operations OBOE I and VI also involved disputes over coordination, which also seemed to occur because of the Australian Army’s institutional ‘infantry’ mindset coupled with its lack of experience in amphibious operations.
The RAAF attempted to retain a measure of independence from the Americans at the operational and tactical levels during the Borneo campaign, but like their Army colleagues the Australian air force was subject to the political decisions of mid-1943 which determined the nature of their employment within the SWPA for the rest of the war. In early 1944, the isolation of Rabaul was complete, plans for the liberation of the Philippines underway, and with the Allied air forces in the SWPA continuing to expand rapidly – reorganization of the RAAF was in order. 35 In June 1944 General Kenny was appointed to command the Far East Air Forces, including the 5th Air Force, the 13th Air Force, and RAAF Command. Each air force was allocated its own operating area, and despite opposition from his own commanders, Kenny decided to use his most powerful force, the 5th Air Force, as his ‘assault force in most of the operations from June 1944 onwards’. 36 The smaller 13th Air Force was assigned mainly to supporting roles, while RAAF Command was relegated to garrison (or mopping-up) duties in New Guinea as well as air operations mounted from the Australian mainland. 37 After some discussion between Kenny and Air Vice Marshal Bostock, it was agreed that the RAAF was also to provide a ‘tactical air force’ that would represent Australia within the Allied air forces that were to advance against Japan in the SWPA. As a consequence on 25 October 1944, the 1st Tactical Air Force (TAF) RAAF was formed. By late April 1945 the 1st TAF had grown to a total of 16,894 personnel, including 1838 officers and aircrew, 15,056 airmen and over 300 aircraft.
As with the Australian Army, the RAAF adopted the British model for organization, administration, equipment and training. RAAF doctrine remained essentially British at its core, however, the rapid wartime expansion of the RAAF, the incompatibility of Western European air strategy in a Pacific theatre (which had less aircraft and very few high quality airbases), forced the RAAF to develop its own fighting style. The RAAF’s doctrine was modified at the tactical level by Australian training methods as well as by American USAAF experiences. 38 It was fairly common for Australian aircrew, who returned from service with the British squadrons in the European theatre, to be informed that they would have to learn how things were done in the Pacific. 39
Of the three Australian Services, the Navy fought as Australian military units working within larger American formations during the OBOE operations. Working within this organization the RAN relied upon the US for senior leadership, planning, command and for logistic support. The RAN never had the opportunity to contribute at the higher command levels during the Pacific War. In contrast, by 1945 both the Australian Army and the RAAF were formed into national formations for Australian-led operations. Although this meant that they were best placed to provide the necessary leadership, planning, command, and logistics for their own Services during the Borneo campaign, both the Army and Air Force were unable to represent their nation effectively at the higher command levels.
The Borneo 1945 campaign was very successful overall, and in the end it did achieve all of the objectives that were established by the Joint Chiefs. 40 For the Australians who planned and conducted Operations OBOE I, VI & II, they were the culmination of six years of experience in warfighting. They were the three largest joint operations ever conducted by Australians. The OBOE operations involved personnel from the RAN, the Australian Army and the RAAF working closely together to achieve their joint objectives, hence the OBOE operations provided much needed experience and a large number of lessons in the conduct of joint operations.
OBOE I: Tarakan
The OBOE I operation commenced, on 11 April, with preliminary air strikes against the Japanese airfields in Borneo, Celebes (now Sulawesi) and Java. There followed an intensive pre-invasion program involving air and sea bombardments as well as minesweeping and hydrographic survey activities. The landings at Tarakan occurred as planned on P-Day, 1 May 1945. 41 Initially there was no resistance, however as the Australian and NEI troops moved inland, they encountered determined Japanese defenders in prepared positions. The OBOE I plans allocated three weeks for the capture of Tarakan Island. In the end it was to take two months to capture the island, with the loss of 225 Australians killed and a further 669 wounded. A single US Army Engineer also lost his life.
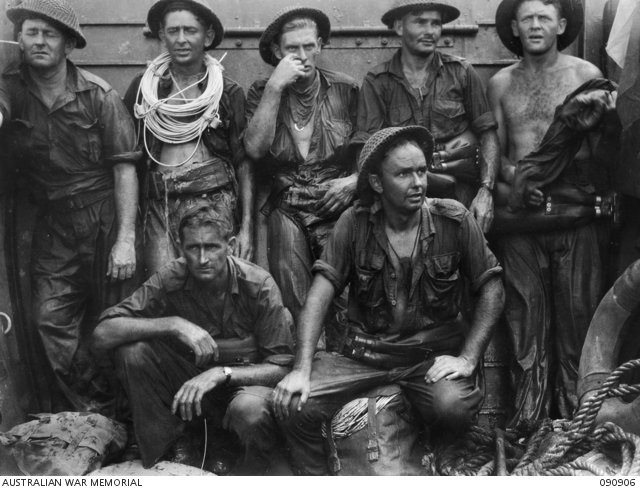
TARAKAN, BORNEO. 1945-04-30. MEN OF 2/13 FIELD COMPANY, ROYAL AUSTRALIAN ENGINEERS, EXHAUSED AFTER THE INITIAL ATTEMPT TO GET ASHORE AT LINGKAS TO BLOW WIRE DEFENCES. THEY REST IN A LANDING CRAFT VEHICLE-PERSONNEL BEFORE A LATER SUCCESSFUL ATTEMPT AT FULL TIDE. IDENTIFIED PERSONNEL ARE:- SAPPER J.F. WILLIAMS (1); SAPPER J.R. MUNRO, LATER KILLED IN ACTION ON SNAG’S TRACK (2); SAPPER J.A. HOFFMANN (3); SAPPER R.A.R. STEVENSON (4); LANCE-CORPORAL R.C. MACE (5); SAPPER D.R. BIDWELL (6); SAPPER C.J. FOLEY (7). (Australian War Memorial ID #090906)
For the Royal Australian Navy, Tarakan was business as usual. For the Australian Army it identified tactical lessons that needed corrective action, however Tarakan also tended to reinforce their single-Service prejudices. Tarakan was a shock for the RAAF. A series of failures and oversights at the tactical level were amplified by examples of poor leadership at all levels of command. While the vast majority of RAAF officers were professionals who did an outstanding job, they were frequently frustrated by others who should not have been in positions of authority. This situation changed with the appointment of the highly competent, Air Commodore Scherger early in May. 47
For many Australians OBOE I was a tragedy, but Americans have tended to take a broader long-term approach seeing the operation as just one of many stepping stones along the pathway to victory. 48 The Australian Navy had performed well alongside their US Navy colleagues in what was, to them, just another amphibious operation. The official US Naval Historian’s assessment of OBOE I was succinct, ‘this was a very well conducted amphibious operation, which attained its objectives with minimum loss’. 49
OBOE VI: Brunei Bay and Labuan
The decision to bring forward the OBOE VI operation, on the western side of Borneo, was a strategic surprise to the Japanese. The area around Brunei Bay facilitated rapid deployments and operational maneuver from the sea. General MacArthur set Z-Day as 10 June 1945. Naval and landing force command for the Brunei Bay amphibious assault, landing 33,500 personnel and 49,500 tons of supplies and equipment, was delegated to Rear Admiral Royal, and Major General George Wootten, commander of the Australian 9th Division.
The Brunei Bay operation was, according to MacArthur, ‘flawlessly executed’. Between 10 June 1945 and the end of the war, the fighting at Brunei Bay and Labuan led to the loss of 119 Australians killed and a further 221 wounded. At least eight Americans lost their lives and 55 were wounded. The Japanese lost 1,375 and 130 captured during this operation, although guerillas probably killed another 1,800 throughout British Borneo.
OBOE II: Balikpapan
The Balikpapan operation, involving the landing of 33,600 personnel and 53,600 tons of supplies and equipment, was commanded by Rear Admiral Albert G. Noble, USN, and Major General Edward Milford, commander of the Australian 7th Division. Before examining the operation in more detail, it will be useful to consider the Allied forces that were assembled for this invasion, particularly the organization and structure of the national contributions within the Naval, Army, and Air components.
The naval forces during the OBOE II operation were led by Admiral Barbey, Commander of the Seventh Amphibious Fleet. The US Navy provided 95 per cent of the Naval Task Organization. It was mostly American in terms of command and doctrine. The RAN did hold a few command positions, including command of the Cruiser Covering Group (TG 74.2) during the consolidation phase, 50 the Transport and Landing Unit, the Hydrographic Unit, the Beachmaster Unit, and, when the garrison was in place, the naval defenses of Balikpapan. Australia provided two cruisers, a destroyer, three Landing Ships Infantry (LSI), four corvettes, two beach commando units, and a support ship. This was a considerable effort for the relatively small RAN. There was no RAN naval aviation capability, and the RAN’s fleet train was almost non existent. Despite its diminutive size, less than five per cent of the total American contribution, the Australian naval effort provided critical leadership and specialist units that worked well within the US Navy’s system. The RAN’s four years of experience of being integrated into US Navy Task Forces was ably demonstrated during this operation. A single Dutch warship, HMNS Tromp, contributed during OBOE II.
The order of battle for the ground forces for the OBOE II is indicative of the Australian Army’s approach. Australians made up 94 per cent of the invasion force. It was built around the Australian 7th Infantry Division. The major Australian contribution, its nine infantry battalions (in three brigades) were central to the activities of the ground force. The Australian artillery and armored units were allocated an infantry support role, and were not well versed in the application of combined arms teams. The US Army provided the specialist amphibious ship-to-shore units for the Australian division. While the Australian Army was responsible for beach operations, the Navy provided a Beachmaster and the RAN Beach Commandos. 51 The NEI troops did fight but were also employed as interpreters and as security for the Netherland Indies civil affairs organization. The RAAF airfield construction squadrons, which were attached to the ground force commander, were to land early and have an airbase ready for Allied aircraft in just four days.
The RAAF organization for the Borneo campaigns was intended to be self-supporting, and by the end of the war the 1st Tactical Air Force controlled approximately 400 aircraft. It was a force to be reckoned with. The 1st TAF RAAF contributed between 1/4 and 1/3 of the aircraft used in the amphibious phases, and provided the majority of the garrison air forces once the Balikpapan airfields were operational. The Allied Air Forces order of battle suggests that the RAAF was at last able to stand upon its own two feet, as one of the three ‘air forces’ participating, but this hides the important working relationship that continued to exist between the RAAF and the USAAF. Although the 1st TAF RAAF, 13th Air Force USAAF, and 5th Air Force USAAF were administratively independent, they were all flexibly deployed and mutually dependent when it came to command, logistics, and specialist functions.
Action at Balikpapan
The landing at Balikpapan on F-Day, 1 July 1945, was the largest as well as the last Australian amphibious operation of World War II. To this day, Balikpapan also remains the largest amphibious operation ever led by Australians. One would expect that as this was the third operation in the OBOE series, the planning and execution problems of the first two operations would have been ironed-out and that previous lessons would have been taken onboard. Unfortunately this was not the case. Although various tactical level improvements were made before the Balikpapan operation, things did not run as smoothly as they should have.
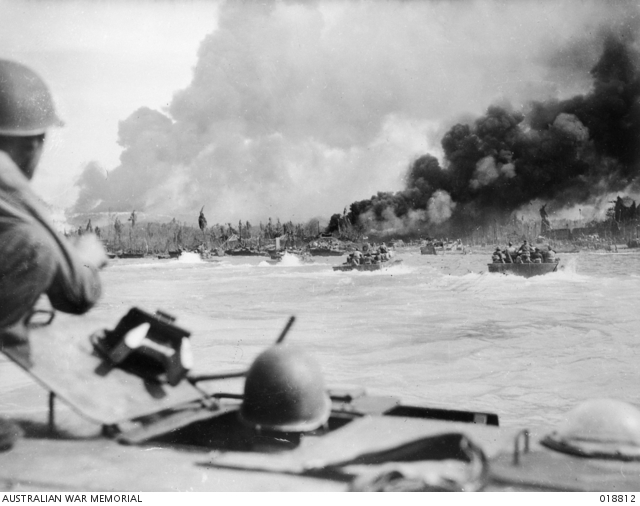
Last dash to shore, aboard American manned Alligators, during the landing of Australian troops at Balikpapan, Borneo. Smoke from the ruins of enemy positions and burning oil wells is visible in the background. Shore installations were subjected to an intensive naval bombardment before the landing operation. (Australian War Memorial ID #018812)
The pre-invasion phase commenced when the first minesweepers and their naval covering force arrived off Balikpapan on 15 June, 16 days before the landings. This was to be the longest pre-invasion phase of any landing conducted during WWII. Surprise was not an element of the plan. The beaches at Klandasan were at the heart of the Japanese defenses. They were heavily defended with anti-aircraft weapons, massive tank traps, and hills overlooking the beaches that contained positions for coastal defense guns, revetments, tunnels and pillboxes. Offshore defenses included logs that were pile-driven into the mud to prevent the beach from being approached by landing craft or other vessels. The adjacent waterways were also heavily mined, with magnetic and acoustic mines laid defensively by the Dutch, and the Japanese, as well as mines laid offensively by the Australians and Americans. In addition, the approaches were so shallow that larger warships would find it difficult provide close-in gunfire support for the minesweeping operations. 53
Although plans for OBOE II had originally included a large number of air attacks from 1st TAF aircraft based at Tarakan, the delays in the completion of that airfield meant that alternative arrangements had to be made. 54 Firstly, 13th Air Force was to fly P-38 Lightnings from Sanga-Sanga airfield to provide fighter cover over the OA. Secondly, the US Navy was concerned that the USAAF Lightnings would not be able to provide a CAP in all weather conditions, and therefore they requested and obtained an escort carrier task group from the 3rd Fleet for the assault phase. 55 The third change to the air plans, resulting from the non-availability of the Tarakan airfield, was the need for RAAF Command to use long-range Liberator bombers operating from Morotai, Samar and Palawan. 56 Liberators attacked the Balikpapan defenses with increasing intensity from 19 June. On 27 June the strong Japanese coastal defenses were attacked by 123 Liberators and 73 Mitchell bombers. These bombing raids helped in providing a diversion for the US Navy Underwater Demolition Teams (UDTs) to perform their work clearing beach obstacles. Their high-level bombing runs were very accurate, with bombs aimed at targets that were more than 100 yards from the high-water mark in order to avoid the men of the UDTs.
The minesweeping operations commenced on 15 June. They initially worked well offshore, however, when they closed the harbor on 17 June, the minesweepers were fired upon by Japanese defenders. Every day for the next two weeks the minesweepers continued their work among the mines, like sitting ducks they absorbed damage from mines and enemy gunfire. Three American minesweepers were lost, and eight others suffered extensive damage by mines or shell fire, with many crew members killed or suffering horrific wounds -but they got the job done. No other vessel was damaged by mines during the rest of OBOE II. 57 The US Navy’s UDTs 11 and 18 arrived at Balikpapan on 24 June, and made a diversionary reconnaissance of Manggar beach before they started to clear the beaches at Klandasan on 27 June. Frogmen drew fire from the Japanese ashore, but in bright moonlight managed to blow gaps through the beach obstacles that permitted a reasonably safe landing. 58 While these activities were going on the hydrographic survey crews were busy marking the swept channel and the approaches to the beaches.
The naval covering group provided whatever protection they could to the minesweepers, and the daily air strikes by the Allied air forces helped to divert the Japanese attention for a time. On 17 June, the covering group also commenced its preliminary bombardment of targets on Balikpapan. The cruiser fleet was attacked with bombs dropped by Japanese aircraft at dusk on 17 June. Japanese aircraft returned twice, with a total of seven planes, but they did no damage. On the evening of 25 June an estimated five to seven torpedo planes attacked the naval units off Balikpapan, but they missed their targets and lost three aircraft from the naval anti-aircraft fire. The USAAF Lightnings providing CAP had departed the OA before these attacks took place. The escort carrier group, under Admiral Sample, arrived early on 1 July and provided an efficient CAP over the 7th Amphibious Fleet for the next three days. The Carrier Group’s aviators also flew several CAS missions in support of the Australian troops on 1 and 3 June. One escort carrier CAS mission that went ahead against RAAF commander’s protests ended disastrously for the Australians. 59 The amphibious attack group (TG 78.2) conducted a landing rehearsal at Morotai on 24 June, before it departed for Balikpapan two days later. 60
Major General Milford, the Landing Force Commander, led 33,446 troops ashore at Balikpapan. The strengths of the main components were: 61
7th Division units 21,635
I Corps troops 2,737
7th Base Sub-Area 4,961
RAAF 2,052
US and NEI troops 2,061
Total 33,446
Overall 25,000 personnel and 26,800 tons landed during the assault phase, and 8,600 personnel and 26,800 tons during the follow-up phase, with follow-up Navy and Air Force units included. Everyone felt this would be one of the toughest shows yet, so VIPs gathered to witness the landing. It was anticipated that the Japanese would use the same tactics that they were planning to use in defense of the Japanese home islands, and many Allied commanders wanted to see such an operation for themselves prior to Operation DOWNFALL. 62
As the Pacific War progressed the US Navy had increased the amount of naval gunfire allocated to each amphibious assault. An intensive two hour naval bombardment and a final flurry of rockets preceded the landing craft. The Balikpapan landings beat all previous records for ammunition delivered in support an amphibious operation. For the forty minutes prior to landing, Australian and American aircraft hammered the landing beaches. The statistics are astounding; more than 3,000 tons of bombs, 38,052 naval shells (between 3-inch and 8-inch), 114,000 rounds from automatic weapons, and 7361 rockets hit their mark. The first wave landed at 8.55, five minutes early, unopposed. Within two hours all of the seventeen organized waves had successfully landed without a casualty. Evidence of the pre-invasion air and sea bombardment was seen everywhere in the vicinity of the beaches. 63 The fortified beach defenses were obliterated and 460 enemy dead were found in the vicinity. The 7th Division troops had cashed in on Allied sea and air power, ‘and how those Aussies loved it!’ 64
After the landing, the Japanese manned what remained of their coastal defenses. Seventeen out of twenty eight known 90mm guns had been destroyed but the remainder were difficult to knock out. RAAF Liberators flying above the landing communicated directly with Admiral Noble’s command ship USS Washatch. Unfortunately three of these Liberators with aircrew and Army observers were lost due to anti-aircraft fire while observing the ground operations. 65 As the Australian soldiers advanced away from the beachhead, the members of 2/10th Battalion were confronted by a Japanese defensive system on Parramatta Hill, just 800 yards inland from the beach. In a determined infantry attack, supported by artillery, heavy mortars, and Matilda tanks, the 2/10th Battalion was finally able to take the ridge by 2.15 pm. The promised NGS from USS Cleveland did not eventuate as that ship was retasked and its replacement was not in position to register on the target immediately. 66 By the end of F-Day the Australians had advanced 2,000 yards and secured the beach area. On 2 July, the Australian 21st Brigade captured and secured the Sepinggan airfield, and the following day the 18th Brigade had captured Balikpapan town, the docks, and the Klandasan peninsular.
By 6.00 am on 3 July, 16,950 men, 985 vehicles and 1,932 tons of equipment and stores had been landed, and US Navy Seabees had completed a pontoon jetty. 67 As the Australian troops advanced from Balikpapan they came across civilian victims of Japanese atrocities and mutilations, which generated a certain bitterness towards the Japanese amongst the Australians. Evidence found later confirmed that large groups of civilians had been slaughtered. 68 Artillery, mortars and tanks were used in support of the infantry as it advanced against the few remaining Japanese positions. On the morning of 4 July many of the Japanese defenses at Nurse, Nobody and Nail, above Balikpapan, were discovered to be empty. Their extensive tunnels and fire positions contained nothing but dead bodies and graves. Japanese guns caused more casualties upon the advancing Australians but they were silenced by NGS from the USS Eaton. Manggar was bombarded from the sea and air from 5 July but the Japanese held firm for several days under accurate bombardment. This town with its airstrip was finally taken by assault on 9 July. It was a high water mark of Australian joint operations. Major William Russell of 2/14th Battalion described the action, demonstrating that tactical proficiency could frequently overcome difficulties in operational planning.
A perfect application of modern military science, using land, sea and air arms with an unhurried, calculated and deadly precision to pave the way for a final infantry assault with minimum loss … It was a practical example of the … theory that individual lives are more precious than all the bombs, shells and bullets a country can provide. 69
Many of the ships in the amphibious assault ships departed late on 1 July. Scheduled naval bombardments and call fire continued on the days after F-Day, although the strength of the group progressively reduced. The Escort Carrier Group and the Cruiser Covering Group departed late on 3 July. The Australian ships in bombardment force had expended most of their 6-inch and 4.7-inch ammunition, and a lack of replenishment ammunition forced them to remain at Tawi-Tawi for resupply. There was plenty of 8-inch shell available, so HMAS Shropshire was able to return to Balikpapan and to undertake further bombardments from 8 July. Unfortunately over the next few days, few targets were identified by the Australian Army and the naval fire support ships were under-utilized. This generated some inter-Service tension after the event. 70 Naval gunfire was decisive, however, in breaking down the last of the Japanese coastal positions at Manggar on 9 July. In the meantime, the three Australian LSIs arrived at Balikpapan with reinforcements and left their last amphibious operation of the Pacific War with little fanfare. They had made a most notable contribution in almost all of the SWPA offensives, but their effort was never adequately recognized in Australia.
Allied aircraft flew almost daily interdiction and CAS missions in support of the ground forces. As a general rule, ground forces needed to allow 100 yards between themselves and an air attack. The only glitches in CAS, one of which resulted in Australian casualties, were caused by decisions to depart from the agreed and understood air support arrangements. Fighter direction worked well, with US Navy Fighter Director Destroyer teams handing over tactical control of CAP aircraft to the RAAF’s Mobile Fighter Control Unit (MFCU), as soon as ashore communications and radar facilities had been established. Australian and American liaison officers were attached to both units to assist with the smooth transition. As with previous OBOE operations, Allied aircraft flew anti-submarine and convoy protection, air sea rescue, photographic, maritime reconnaissance and smoke laying missions throughout. 71
A smaller naval force, which included a number of Australian corvettes, was left behind at Balikpapan to undertake convoy escort, survey work, and to provide NGS to the troops ashore. On 21 July, the RAN took over responsibility for the naval Defence of the port and the last of the US Navy ships left Balikpapan. 72 On 26 July, HMAS Gascoyne fired the last naval bombardment of the campaign, 168 rounds of 4-inch shell, in support of the Australian troops (known as Buckforce) moving up the Balikpapan River. RAAF Auster and Boomerang aircraft were able to direct the fall of shot as part of this NGS task.
The squadrons of No 61 Airfield Construction Wing RAAF were landed on 6 July, two days behind schedule, although they commenced work immediately. They managed to repair the damage at Sepinggang, with its 3,000-foot runway, and it became fully operational on 15 July, eight days later than originally planned. Australian Kittyhawks and Spitfires were soon based at Sepinggang flying CAP and CAS missions. 73 Other aircraft, including US Navy Catalinas, used the airfield to tighten their grip on the war against Japanese shipping and submarines in the NEI. The Japanese Army air force made a few last ditch air attacks on the Allies. On 24 July, the biggest air attack of the Borneo campaign occurred, when a group of Japanese twin-engined bombers dropped 25 bombs over the Australians. 74 The air campaign across the NEI continued to wear down the Japanese and with more airbases developed for use by Allied airmen, the air offensive was capable of hitting targets wherever and whenever they desired.
All Japanese resistance in the coastal area ceased by 9 July 1945, as the Japanese survivors withdrew to their defensive positions around Batuchampar. A battle raged along the Milford Highway from 10 July, with the last Japanese defensive positions taken on 21 July. The remnants of the Japanese forces withdrew further inland into the jungle and hills of central and southern Borneo. Despite their retreat, remaining pockets of Japanese resistance put up a desperate defense whenever they were attacked. The 7th Division advance captured the Sambodja oilfields, which were 28 miles from Balikpapan, by the end of July, although the Dutch oil production specialists were unable to bring it back online for several months.
Overall, the Balikpapan operation ‘succeeded fairly swiftly. The attackers possessed the support of powerful weapons: aircraft using bombs, napalm and guns; naval guns; tanks, including flame-throwers; man-handled flame-throwers’. 75 The Australian losses included 229 killed and a further 634 wounded at Balikpapan. 76 Ten Americans lost their lives with a further 62 wounded. 77 The Japanese lost 1,783, (not including an estimated 249 who were buried in blown-up tunnels), and just 63 prisoners. Balikpapan was a tactical success, which demonstrated that the three Australian Services could perform well in joint and combined operations. At the operational and strategic levels, however, Australia remained dependent upon its senior coalition partner, the US.
Lessons Learned and Lessons Missed
It is clear that numerous lessons were learned at the tactical level, and many important improvements were made throughout the Borneo campaign. Although the Australian forces were not necessarily experts in amphibious warfare, their Borneo experience made them more attune with the American approach to the Pacific War. This meant the Australians would have been a valuable follow-on support force for the upcoming Operation DOWNFALL, the invasion of Japan.
The strategic lessons of the Borneo campaign were largely overlooked. The need for Australian leaders to develop and apply national political and military strategies, which would enable the nation to act independently, was not well understood. In 1945, Australia’s reliance upon the Americans was a fundamental part of its approach to warfighting. It remains so.
The final invasions of the Borneo campaign were the most thoroughly planned and best executed joint and combined military operations ever conducted by Australians, but lingering doubts remained. Question marks over the campaign’s political necessity continue to strike a sour note in what would otherwise be a beautiful OBOE concerto.
(Return to April 2016 Table of Contents)
Footnotes
- Overview of the Allied Borneo 1945 campaign may be found in Peter Dennis, et. al., The Oxford Companion to Australian Military History, 2nd edn, Oxford University Press, Melbourne, 2008, pp. 98-103; and Chris Clark, The Encyclopaedia of Australia’s Battles, Allen & Unwin, Sydney, 2010, pp. 251-255. ↩
- Australian Defence Force, ADDP-D, Foundations of Australian Military Doctrine, Department of Defence, Canberra, 2005, paragraph 5.12. ↩
- These four approaches have been developed by the author as part of a wider study on the employment of Australian armed forces in coalition expeditionary operations. ↩
- David Horner, High Command: Australia and Allied Strategy 1939-1945, Allen & Unwin, Sydney, 1982; and Gavin Long, The Six Years War: Australia in the 1939-45 War, The Australian War Memorial, Canberra (AWM), 1973, pp. 181 and 258. ↩
- For example Ensign Leslie Knox, USN, was lost in combat flying an F4F Wildcat at the Battle of the Coral Sea in May 1942. ↩
- Samuel Milner, Victory in Papua, United States Army in World War II, Center of Military History, Washington, DC, 1957, pp. 18-23. ↩
- C.A. Willoughby, (ed.), Reports of General MacArthur, Volume I: The Campaigns of MacArthur in the Pacific, Washington, DC, p. 367. ↩
- ‘OBOE’ was the codename for these series of operations. Operations OBOE III, IV and V were cancelled by the US JCS in April 1945. ↩
- This command structure parallels the modern US approach. For instance the US Central Command (CENTCOM) commander has no fighting units directly subordinate to this Command, rather there are five subordinate service component commands: US Naval Forces Central Command (USNAVCENT), US Air Forces Central (AFCENT), US Army Forces Central Command (ARCENT), US Special Operations Command Central (SOCCENT), and US Marine Forces Central Command (USMARCENT). The current Australian Defence Force (ADF) command structure is contradictory as it is formally based upon joint operational commands, although actual operations in the Middle East Area of Operations are conducted through US CENTCOM’s service component commands. ↩
- In modern parlance, MacArthur commanded at the strategic level of war from Australia’s perspective but at the operational (theatre) level from the US perspective. He did influence strategy by discussing his plans with members of the JCS but the Joint Chiefs really exercised strategic command for the US. See David Horner, ‘The Military Strategy and Command Aspects’, in G. Wahlert, (ed.), Australian Army Amphibious Operations in the South-West Pacific: 1942-45, Army Doctrine Centre, Canberra, 1995, p. 29. ↩
- Vice Admirals Herbert F. Leary and Arthur S. Carpender served as Commander Allied Naval Forces SWPA prior to Kincaid’s appointment in November 1943. ↩
- General Blamey was also the Commander in Chief Australian Military Forces. In practice, by 1945, he commanded the land forces in Australia only and had no direct authority over the Allied forces deployed during the Borneo campaign. ↩
- MacArthur saw Blamey as the person responsible for the overall defence of Australia which included the raise, train and sustain functions for those Australian military forces deployed overseas. As such, when the Allied advance had moved away from Australian territory Blamey did not have responsibility for operational level command in the SWPA. In fact Lieutenant General J. Northcott undertook many of these duties as the Australian Chief of General Staff (CGS). The air force command arrangements were even more problematic. Air Vice Marshal George Jones commanded the RAAF ‘administration’ (including the raise, train and sustain functions) as the Australian Chief of Air Staff (CAS), but his nemesis Air Vice Marshal Bostock commanded all RAAF operations throughout Australia and overseas. The conflict between Jones and Bostock, which the Australian Government created but never resolved, even escalated to the extent that RAAF operations were adversely affected, especially during the Borneo campaign. This situation was perhaps clearer for the Australian naval forces. Admiral Guy Royle, who was Australia’s Chief of Naval Staff (CNS), was responsible for the raise, train and sustain functions for the RAN and also the commander Southwest Pacific Sea Frontier. ↩
- The Australian I Corps consisted of two veteran divisions, the 7th Division formed around the 18th, 21st and 25th Brigades Groups, and the 9th Division with the 20th, 24th and 26th Brigade Groups. ↩
- Daniel E. Barbey, MacArthur’s Amphibious Navy: Seventh Amphibious Force Operations 1943-1945, United States Naval Institute, Annapolis, MD, 1969, p. 59. ↩
- The last Australian serviceman to be killed on the ground as a result of enemy air attack was Brigadier Shirley Goodwin, at Finschhafen in New Guinea, on 25 October 1943. ↩
- Odgers, Air War against Japan 1943-1945, pp. 391-409. ↩
- Ooi Keat Gin, ‘Prelude to Invasion: Covert operations before the re-occupation of Northwest Borneo, 1944-45’, Journal of the Australian War Memorial, No. 37, October 2002, <www.awm.gov.au/journal/j37/ borneo.asp> (14 August 2011). ↩
- Samuel E. Morison, History of United States Naval Operations in World War II, Volume XIII, The Liberation of the Philippines: Luzon, Mindanao, the Visayas 1944-1945, Little Brown, Boston, 1959, pp. 278-288. ↩
- Willoughby, Reports of General MacArthur, Vol. I, p. 372. ↩
- The dispute is discussed in G. Hermon Gill, Royal Australian Navy 1942-1945, Australia in the War of 1939-1945, AWM, Canberra, 1968, pp. 647-648; and Long, The Final Campaigns, pp. 504-506. ↩
- Quoted in D. Clayton James, The Years of MacArthur, Volume II, 1941-1945, Houghton Mifflin, Boston, 1975, p. 752; also in Horner, ‘The Military Strategy and Command Aspects’, in Wahlert, Australian Army Amphibious Operations in the South-West Pacific: 1942-45, p. 43 & pp. 45-46, where Barbey’s view is supported by the comments of Tim Vincent, who served in Borneo. ↩
- Horner, ‘The Military Strategy and Command Aspects’, in Wahlert, Australian Army Amphibious Operations in the South-West Pacific: 1942-45, p. 29. ↩
- For an overview of the RAN involvement in the Pacific War see, James Goldrick, ‘1941-1945, World War II: The War against Japan’, in David Stevens, (ed.), The Royal Australian Navy, Oxford University Press, Melbourne, 2001, pp. 127-154. ↩
- Stevens, The Royal Australian Navy, p. 134. ↩
- When Australian Naval units, which had served as part of the British Pacific Fleet (BPF), compared notes with their colleagues, who had served for years as part of the US Seventh Fleet, they discovered numerous interoperability problems between ships nominally of the same Navy. Interoperability problems also occurred between the BPF and the US Fleets when operating off Japan in 1945. One of the most well known is the differences between flag signals given to aircraft landing on British and American aircraft carriers. ↩
- Admiral Royle, the Australian Chief of Naval Staff, had tried to expand the RAN contribution, with an aircraft carrier, two additional cruisers and 6 destroyers, but his proposal was turned down by the Australian Government ostensibly due to the shortage of manpower in Australia. See G. Hermon Gill, Royal Australian Navy 1942-1945, Australia in the War of 1939-1945, AWM, Canberra, 1968, pp. 471-472. ↩
- Australia contributed three divisions (6th, 7th and 9th) to the Middle East, serving with British-led operations in North Africa, Greece and Syria. The last, the 9th Division which had been retained in theatre to fight in the Battle of el Alamein, finally returned to Australia in February 1943. The British saw their command structure as ‘a segment of the British Army into which Dominion components under Dominion command were fitted. The idea of a mixed Commonwealth force with commanders freely interchangeable among the high posts on a basis of experience and capability was not conceived’, Barton Maughan, Tobruk and El Alamein, Australia in the War of 1939-1945, AWM, Canberra, 1966, pp. 157-158. ↩
- The situation is treated in some detail in Long, The Final Campaigns, pp. 388-396; and Paul Hasluck, The Government and the People 1942-1945, Australia in the War of 1939-1945, AWM, Canberra, 1970, pp. 565-582. ↩
- The failure of the Australian Government and its senior military commanders in the Media and Public Affairs arena during 1944, also had far reaching implications, which in turn did adversely influence the Australian public’s perception of the 1945 Borneo campaign. This is touched upon by Robert Deane, but much more work can be done on this important topic, see Robert Dean, ‘The Balancing Act: The Australian Government and the War in the South-West Pacific, 1944-45’, in Wahlert, Australian Army Amphibious Operations in the South-West Pacific: 1942-45, p. 29 ↩
- ‘Second XI’ is a term taken from the popular British sport cricket (which has eleven players). It refers to a second order team, selected for to provide experience to upcoming players and to back-up any of the ‘First XI’ players in an emergency. See Mark Johnston, Whispering Death: Australian Airmen in the Pacific War, Allen & Unwin, Sydney, 2011, pp. 425-426. ↩
- For instance British Army’s Field Service Regulations were issued, albeit infrequently, to Australian Army units. ↩
- Wahlert, ‘Don’t do it – Some Advice from Veterans’, in Wahlert, Australian Army Amphibious Operations in the South-West Pacific: 1942-45, p. 171. ↩
- David Dexter, The New Guinea Offensives, Australia in the War of 1939-1945, AWM, Canberra, 1961, p. 321n. ↩
- Odgers, Air War against Japan 1943-1945, pp. 295-299. ↩
- Odgers, Air War against Japan 1943-1945, p. 296. ↩
- RAAF Command was responsible for the offensive air campaign over the NEI, Timor and the southern coastal areas of New Guinea which were mounted by the North and the North-Western Area commands from airfields in northern Australia. A number of such air operations were conducted in support of the Borneo campaign. See also Gary Waters, OBOE: Air Operations over Borneo 1945, Air Power Studies Centre, Canberra, 1995, pp. 8-9. ↩
- During much of 1942 and 1943 RAAF personnel supplemented USAAF units, to gain experience in operating American aircraft and to help fill some personnel gaps. ↩
- Johnston, Whispering Death, pp. 205-206. ↩
- There is currently no joint history of the Borneo campaign, although Peter Stanley, Tarakan: An Australian Tragedy, Allen & Unwin, Sydney, 1997, does cover most of the Australian involvement in OBOE I. The Borneo operations are detailed within the Australian and American official histories. For Navy see Gill, Royal Australian Navy 1942-1945, pp. 616-624, 636-658; and Morison, The Liberation of the Philippines: Luzon, Mindanao, the Visayas 1944-1945, pp. 255-277. For Army see Long, The Final Campaigns, pp. 406-547, and Hugh J. Casey, (ed.), Engineers of the Southwest Pacific, 1941-1945, Volume IV, Amphibian Engineer Operations, US Army, Corps of Engineers, Washington, DC, 1959. For Air Force see Odgers, Air War against Japan 1943-1945, pp. 451-490, Waters, OBOE: Air Operations over Borneo 1945, and Wesley F. Craven and James L. Cate, (eds.), The Pacific: Matterhorn to Nagasaki, June 1944 to August 1945, Volume V, The Army Air Forces in World War II, University of Chicago Press, Chicago, 1953, pp. 463-469. These are used as primary sources for the content of this section. The present author also appreciates that these official publications at times do understate or intentionally misinform when it comes to operational errors. ↩
- P-Day was used in the OBOE I plan, instead of the more popular D-Day designation, as used at Normandy in 1944. OBOE VI had its Z-Day and OBOE II its F-Day. ↩
- Gary Waters, ‘The Tarakan Operation – Air Power Lessons’, in Alan Stephens, (ed.), The RAAF in the SWPA 1942-1945: RAAF History Conference 1993, Air Power Studies Centre, Canberra, 1993, pp. 119-137, quote by Neville McNamara on p. 136. ↩
- Odgers, Air War against Japan 1943-1945, p. 461. ↩
- Joint intelligence by necessity involves air, naval and military intelligence specialists. In the case of Tarakan a fundamental assessment error in the suitability of one airfield negated the value of what was otherwise a comprehensive and detailed intelligence plan. See Odgers, Air War against Japan 1943-1945, p. 461; and Long, The Final Campaigns, p. 451. ↩
- Craven & Cate, The Pacific: Matterhorn to Nagasaki, June 1944 to August 1945, p. 466. ↩
- Rear Admiral W.D. Sample, USN, led three US Navy escort carriers (CVE), Suwannee, Chenango and Gilbert Islands, with six escorts. These ships with their US Navy and US Marine Corps aviation units were detached from the US 3rd Fleet operations in support of Okinawa. See Morison, The Liberation of the Philippines: Luzon, Mindanao, the Visayas 1944-1945, p. 272; and Gill, Royal Australian Navy 1942-1945, p. 649. ↩
- See note 17. Air Commodore Fred Scherger went on to become a well respected leader of the RAAF, a Chief of Air Staff, and the first Australian airman to command the Australian Chiefs of Staff Committee. He retired as an Air Chief Marshal in 1965. ↩
- Barbey, MacArthur’s Amphibious Navy, pp. 355 & 358; and Daniel E. Barbey, Command History, Seventh Amphibious Force, 10 January 1943 – 23 December 1945, US Navy, unpublished report, see esp. pp. I-13 & I-14, and for an overall impression, see Annexes A, B & C. (Available at the US Naval Historical Centre, Washington, DC). ↩
- Morison, The Liberation of the Philippines: Luzon, Mindanao, the Visayas 1944-1945, p. 263. ↩
- The Senior Australian Naval Officer present, Commodore Harold B. Farncomb, RAN, took command of TG 74.2 on 7 July 1945. ↩
- See David Stevens, ‘Maritime Aspects of Australian Amphibious Operations’, in Wahlert, Australian Army Amphibious Operations in the South-West Pacific: 1942-45, pp. 119-122 & 124; and Karl James, ‘”Hell was Let Loose”, Making Order from Confusion: The RAN Beach Commandos at Balikpapan, July 1945’, International Journal of Naval History, Vol. 8, No. 2, August 2009. ↩
- Craven & Cate, The Pacific: Matterhorn to Nagasaki, June 1944 to August 1945, pp. 316-322; and Odgers, Air War against Japan 1943-1945, p. 480. ↩
- Morison, The Liberation of the Philippines: Luzon, Mindanao, the Visayas 1944-1945, pp. 268-269; and Gill, Royal Australian Navy 1942-1945, pp. 651-652. ↩
- Air support for OBOE II was provided by 1st TAF (RAAF), the 13th AF (USAAF), the 5th AF (USAAF), and elements of the Australian Northern Area and North-Western Area Commands. The US Navy also contributed aircraft from Fleet Air Wing Ten of the US 7th Fleet, as well as the escort carrier aircraft (US Navy Escort Carrier Group 40, and Marine Air Groups 1 and 2) of the US 3rd Fleet. ↩
- See note 49 above. ↩
- A number of the Liberator missions were flown from remote airfields up to 700 miles (or approximately 1,100 kilometers) away. ↩
- Morison, The Liberation of the Philippines: Luzon, Mindanao, the Visayas 1944-1945, p. 270. ↩
- Morison, The Liberation of the Philippines: Luzon, Mindanao, the Visayas 1944-1945, pp. 270-271. ↩
- Waters, OBOE: Air Operations over Borneo 1945, p. 132; Odgers, Air War against Japan 1943-1945, p. 485; Long, The Final Campaigns, p. 519; the Australian casualties are not mentioned, and the date is incorrect in Morison, The Liberation of the Philippines: Luzon, Mindanao, the Visayas 1944-1945, p. 272. ↩
- Gill, Royal Australian Navy 1942-1945, pp. 651-652. ↩
- Long, The Final Campaigns, p. 506. ↩
- Barbey, MacArthur’s Amphibious Navy, p. 316. ↩
- Gill, Royal Australian Navy 1942-1945, p. 654. ↩
- Morison, The Liberation of the Philippines: Luzon, Mindanao, the Visayas 1944-1945, pp. 276. ↩
- Odgers, Air War against Japan 1943-1945, pp. 485-487. ↩
- Long, The Final Campaigns, p. 516. ↩
- Elements of three naval construction battalions fought at Balikpapan, see Department of Navy, Building the Navy’s Bases in World War II: History of the Bureau of Yards and Docks and the Civil Engineer Corps, 1940-1946, Volume II, US Government Printing Office, Washington, DC, 1947, p. 396. ↩
- Long, The Final Campaigns, p. 522. ↩
- Quoted in Peter Stanley, Borneo 1942-1945: Australians in the Pacific War, Department of Veteran’s Affairs, Canberra, 2005, p. 16. ↩
- Gill, Royal Australian Navy 1942-1945, p. 655. ↩
- Waters, OBOE: Air Operations over Borneo 1945, pp. 137-138. The air sea rescue aircraft proved themselves on 6-7 July when a RAAF Catalina picked up a Kittyhawk pilot whose aircraft was hit by anti-aircraft fire and subsequently lost at sea. ↩
- Gill, Royal Australian Navy 1942-1945, p. 657. ↩
- Odgers, Air War against Japan 1943-1945, p. 488; and David Wilson, Always First: The RAAF Airfield Construction Squadrons 1942-1974, Air Power Development Centre, Canberra, 1998, pp. 89-91. ↩
- Odgers, Air War against Japan 1943-1945, p. 489. ↩
- Long, The Final Campaigns, p. 546. ↩
- Long, The Final Campaigns, p. 545; including 48 Australian aircrew, most of whom lost their lives in five separate incidents in which Liberator aircraft were lost. See Odgers, Air War against Japan 1943-1945, p. 489. ↩
- These figures include US Navy and US Army Engineers, but do not include USAAF losses over Borneo. ↩